Difference between revisions of "X-Carve: Easel"
(Created page with "Category:WoodshopCategory:X-Carve ==Introduction== The Spark Woodshop uses the default software for the X-Carve, which is Easel. Easel is a combination of computer ai...") |
|||
| Line 9: | Line 9: | ||
Go to [https://easel.inventables.com/users/sign_in https://easel.inventables.com/users/sign_in] and choose "Create New Account" then follow the prompts. New accounts should go through the [[#Machine Setup|Machine Setup]] process for the Spark X-Carve. | Go to [https://easel.inventables.com/users/sign_in https://easel.inventables.com/users/sign_in] and choose "Create New Account" then follow the prompts. New accounts should go through the [[#Machine Setup|Machine Setup]] process for the Spark X-Carve. | ||
| − | ==Easel Screen== | + | ==Easel Start Screen== |
| − | [[File:WS_X-Carve_EaselScreen.png]] | + | Upon logging in, the Easel Start Screen will appear, as in the example shown below. Users can either choose an existing project to continue working on, or click the green "New Project" button to start a new project from scratch. Either option will bring them to the [[#Easel Main Screen|Easel main screen]]. |
| − | + | ||
| − | + | ||
| − | + | [[File:WS_X-Carve_EaselStartScreen2.png|center|upright=1.0|border]] | |
| − | + | ||
| − | + | ||
| − | + | ==Easel Main Screen== | |
| − | + | The main easel screen is broken up into two major sections, the CAM portion on the left half of the screen, and the simulation portion on the right. The divider separating the two can be dragged left and right with the mouse to change the area of screen dedicated to each side. | |
| − | + | ||
| − | + | [[File:WS_X-Carve_EaselScreen.png|upright=1.0]] | |
| − | + | ||
| − | + | {| class="wikitable" style="width:960px;" | |
| − | + | |- | |
| − | + | !'''A.''' CAM Workspace !! '''B.''' Simulation Workspace | |
| − | + | |- | |
| − | + | | style="width: 49%"|'''C.''' Project Name ||'''I.''' [[X-Carve: Easel - Carve|Carve Controls]] | |
| − | + | |- | |
| + | |'''D.''' [[X-Carve: Easel - Geometry|Geometry Toolbar]] || '''J.''' [[X-Carve: Easel - Jog|Machine Jog Controls]] | ||
| + | |- | ||
| + | |'''E.''' X and Y axis origin - “zero” || '''K.''' [[X-Carve: Easel - Materials|Workpiece Definitionl]] | ||
| + | |- | ||
| + | |'''F.''' Units Toggle || '''L.''' [[X-Carve: Easel - Cutters|Cutting Bit Selection]] | ||
| + | |- | ||
| + | |'''G.''' Additional Workpieces (shown hidden) || '''M.''' [[X-Carve: Easel - Depths and Speeds|Cut Settings (depth of cut, “feeds and speeds”)]] | ||
| + | |- | ||
| + | |'''H.''' Zoom and Home controls || '''N.''' [[X-Carve: Easel - Simulation|Simulation Start Button]] | ||
| + | |} | ||
| + | |||
| + | |||
==Machine Setup== | ==Machine Setup== | ||
For new Easel accounts, or Easel accounts use for other machines, the Spark X-Carve parameters need to be input into Easel. To do so, <span style="color: red"> choose the "Machine" option in the top left of the screen, and click on the "Edit Your Machine" button. </span> Match the parameters to the image below, then press the Save button. | For new Easel accounts, or Easel accounts use for other machines, the Spark X-Carve parameters need to be input into Easel. To do so, <span style="color: red"> choose the "Machine" option in the top left of the screen, and click on the "Edit Your Machine" button. </span> Match the parameters to the image below, then press the Save button. | ||
| − | [[file:WS X-Carve MachineSetup.png]] | + | [[file:WS X-Carve MachineSetup.png|center|upright=1.0]] |
Revision as of 22:19, 4 February 2023
Introduction
The Spark Woodshop uses the default software for the X-Carve, which is Easel. Easel is a combination of computer aided design (CAD) and computer aided manufacturing (CAM) software. It is a very user friendly software, but has limited capabilities. It is free to sign up for an account, but some more advanced capabilities require a subscription.
Login to Easel
Go to https://easel.inventables.com/users/sign_in and sign in
Creating a New Easel Account
Go to https://easel.inventables.com/users/sign_in and choose "Create New Account" then follow the prompts. New accounts should go through the Machine Setup process for the Spark X-Carve.
Easel Start Screen
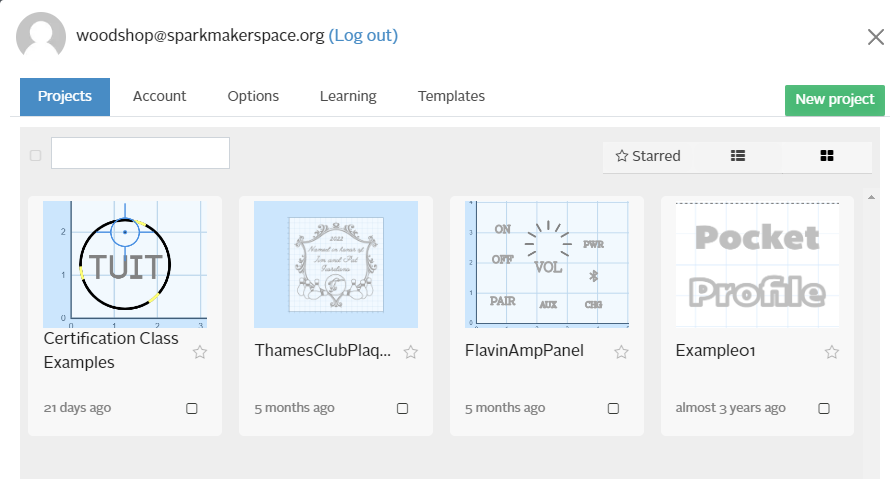
Upon logging in, the Easel Start Screen will appear, as in the example shown below. Users can either choose an existing project to continue working on, or click the green "New Project" button to start a new project from scratch. Either option will bring them to the Easel main screen.
Easel Main Screen
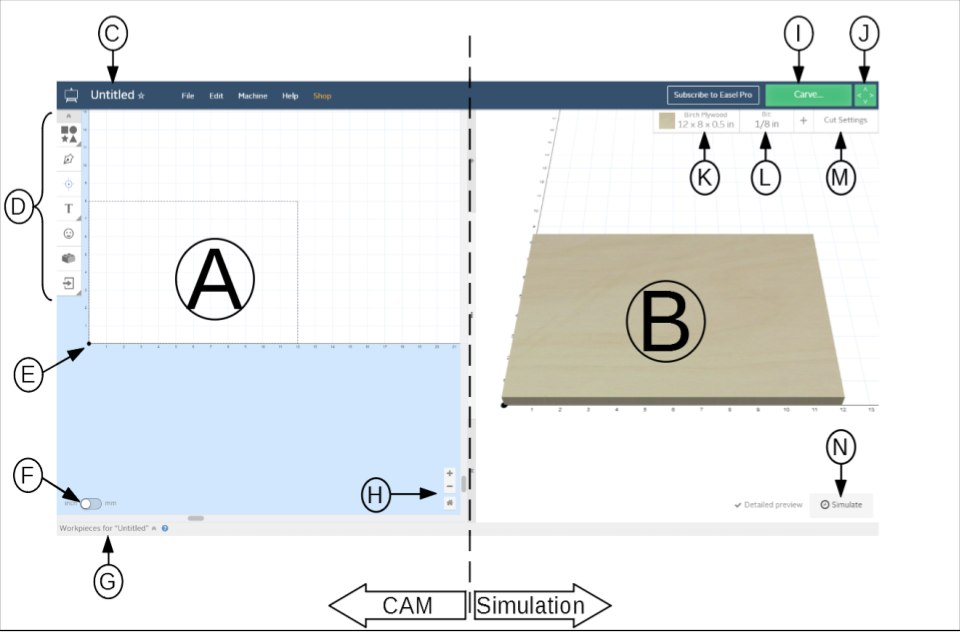
The main easel screen is broken up into two major sections, the CAM portion on the left half of the screen, and the simulation portion on the right. The divider separating the two can be dragged left and right with the mouse to change the area of screen dedicated to each side.
| A. CAM Workspace | B. Simulation Workspace |
|---|---|
| C. Project Name | I. Carve Controls |
| D. Geometry Toolbar | J. Machine Jog Controls |
| E. X and Y axis origin - “zero” | K. Workpiece Definitionl |
| F. Units Toggle | L. Cutting Bit Selection |
| G. Additional Workpieces (shown hidden) | M. Cut Settings (depth of cut, “feeds and speeds”) |
| H. Zoom and Home controls | N. Simulation Start Button |
Machine Setup
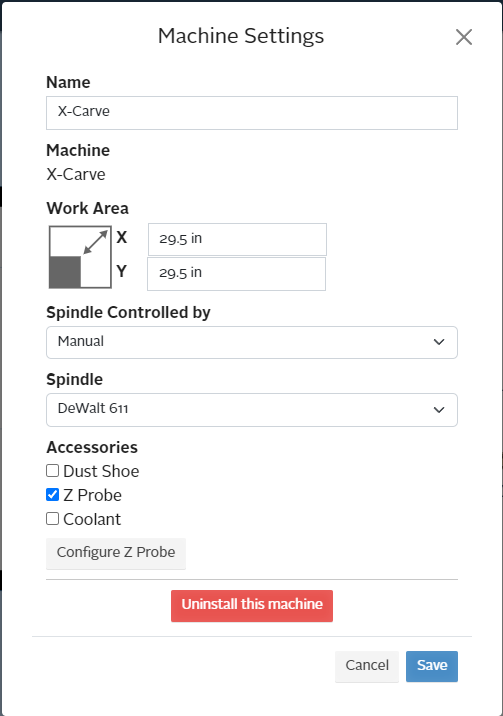
For new Easel accounts, or Easel accounts use for other machines, the Spark X-Carve parameters need to be input into Easel. To do so, choose the "Machine" option in the top left of the screen, and click on the "Edit Your Machine" button. Match the parameters to the image below, then press the Save button.


