Difference between revisions of "X-Carve: Example Geometry"
Jump to navigation
Jump to search
| Line 2: | Line 2: | ||
[[Category:X-Carve]] | [[Category:X-Carve]] | ||
[[Category:Woodshop Class]] | [[Category:Woodshop Class]] | ||
| − | |||
This tutorial will guide a new user through the basic steps of using the [[X-Carve Router]]. The project will be a small [https://en.wiktionary.org/wiki/tuit#English round tuit] out of multi-color HDPE plastic. | This tutorial will guide a new user through the basic steps of using the [[X-Carve Router]]. The project will be a small [https://en.wiktionary.org/wiki/tuit#English round tuit] out of multi-color HDPE plastic. | ||
==Start A New Project== | ==Start A New Project== | ||
| + | ''See also: [[X-Carve: Easel]]'' | ||
| + | |||
# If you haven't already, create an Easel account by following the steps on [[X-Carve: Easel]] page. | # If you haven't already, create an Easel account by following the steps on [[X-Carve: Easel]] page. | ||
## Make sure to [[X-Carve: Easel#Machine Setup|set up the Spark X-Carve]] in the new account | ## Make sure to [[X-Carve: Easel#Machine Setup|set up the Spark X-Carve]] in the new account | ||
| Line 12: | Line 13: | ||
==Define Project Material== | ==Define Project Material== | ||
| − | + | ''See also: [[X-Carve: Easel - Materials]]'' | |
| − | + | ||
| − | {| | + | {| class="wikitable" |
|- | |- | ||
| + | ! scope="row" | Step 1: | ||
| + | |[[file:WS X-Carve MaterialButton.png|center]] | ||
| | | | ||
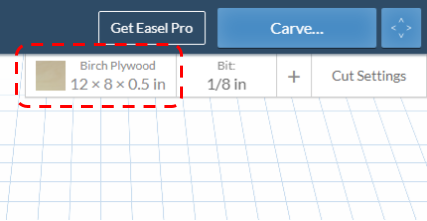
| − | [[file:WS X-Carve ClassMaterialMarkup.png]] | + | #The first step is to define the [[X-Carve: Easel - Materials|workpiece material]]. Start by clicking on the Materials button in the upper right corner of the Easel window. |
| + | |- | ||
| + | ! scope="row" | Step 2: | ||
| + | | [[file:WS X-Carve ClassMaterialMarkup.png|center]] | ||
| | | | ||
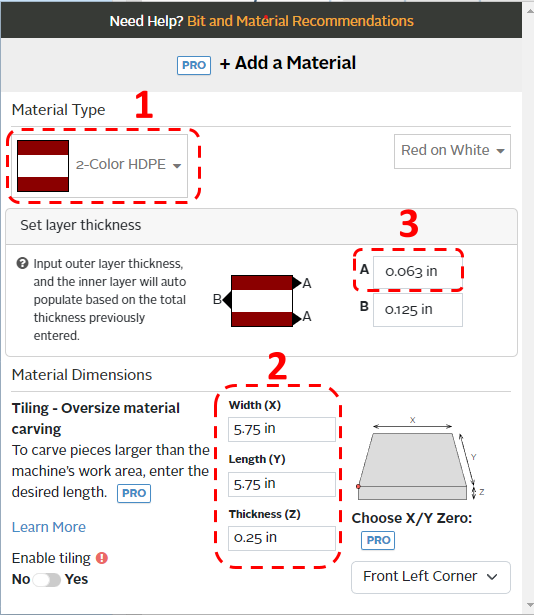
# Use the dropdown menu to select '''2-Color HDPE'''. | # Use the dropdown menu to select '''2-Color HDPE'''. | ||
| Line 26: | Line 32: | ||
# Click the Material button again, or outside the popup window, to close the Material popup window. | # Click the Material button again, or outside the popup window, to close the Material popup window. | ||
|} | |} | ||
| − | . | + | |
| + | |||
| + | ==Set Project Cutting Bit== | ||
| + | ''See also: [[X-Carve: Easel - Cutters]] '' | ||
| + | |||
| + | {| class="wikitable" | ||
| + | |- | ||
| + | ! scope="row" | Step 1: | ||
| + | |[[file:WS X-Carve BitButtonMarkup.png|center]] | ||
| + | | | ||
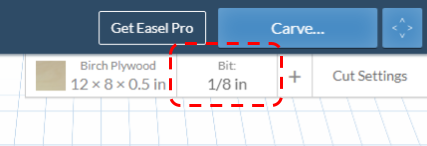
| + | # Once the material has been defined, the next step is to define the cutting tool, or "''cutter''", which may also called "''bit''", as Easel does. Start defining the cutting bit by clicking on the Bit button in the upper right corner of the Easel Window. | ||
| + | |- | ||
| + | ! scope="row" | Step 2: | ||
| + | | [[file:WS X-Carve ClassCuttingBit.png|center]] | ||
| + | | | ||
| + | # Choose the '''1/16 Fishtail Spiral''' bit from the list. | ||
| + | #* If the correct bit is not shown on the list, follow the steps on the [[X-Carve: Easel - Cutters|cutter]] page to add it. | ||
| + | # Click the Bit button again, or outside the popup window, to close the Bit popup window. | ||
| + | |} | ||
| + | |||
| + | ===Set Project Feeds and Speed=== | ||
| + | ''See also: [[X-Carve: Easel - Depths and Speeds]]'' | ||
| + | |||
| + | {| class="wikitable" | ||
| + | |- | ||
| + | ! scope="row" | Step 1: | ||
| + | |[[file:WS X-Carve CutSettingButton.png|center]] | ||
| + | | | ||
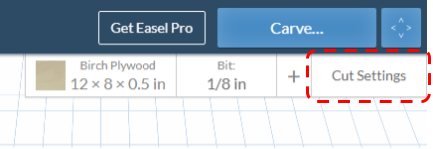
| + | # This class will use the default settings for cutting feed rate and spindle speeds, which Easel will set automatically based on the material and cutter choices. Click on the Cut Settings button in the upper right corner of the Easel window. | ||
| + | |- | ||
| + | ! scope="row" | Step 2: | ||
| + | | [[file:WS X-Carve ClassCutSettings.png|center]] | ||
| + | | | ||
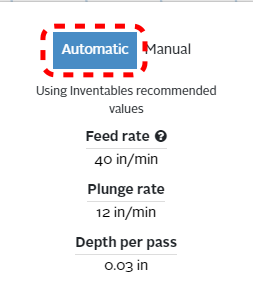
| + | # Ensure that the '''Automatic''' option is highlighted blue by clicking on it. | ||
| + | #* Feed settings should be similar to the ones shown at left | ||
| + | |} | ||
Revision as of 21:38, 11 February 2023
This tutorial will guide a new user through the basic steps of using the X-Carve Router. The project will be a small round tuit out of multi-color HDPE plastic.
Start A New Project
See also: X-Carve: Easel
- If you haven't already, create an Easel account by following the steps on X-Carve: Easel page.
- Make sure to set up the Spark X-Carve in the new account
- Start a new project using the green button in the upper right of the Easel Start Screen
- Easel will bring you to the Easel Main Screen
Define Project Material
See also: X-Carve: Easel - Materials
| Step 1: |
| |
|---|---|---|
| Step 2: |
|
Set Project Cutting Bit
See also: X-Carve: Easel - Cutters
| Step 1: |
| |
|---|---|---|
| Step 2: |
|
Set Project Feeds and Speed
See also: X-Carve: Easel - Depths and Speeds
| Step 1: |
| |
|---|---|---|
| Step 2: |
|
