Difference between revisions of "X-Carve Router"
| Line 52: | Line 52: | ||
==X-Carve Baseline Configuration== | ==X-Carve Baseline Configuration== | ||
| − | + | #E-stop is pressed | |
| − | + | #Computer and controller are left powered on | |
| − | + | #Cutter is removed from the router spindle | |
| − | + | #Collet and nut are removed from the router spindle, and put in the correct location on the CNC storage tray | |
| − | + | #All clamp arms, clamp bases, and clamp screws are removed from the work table and put in the correct location on the CNC storage tray | |
| − | + | #The machine and the area around it is cleaned of chips and debris | |
Revision as of 19:01, 4 February 2023
Introduction
Spark Makerspace has an X-Carve CNC (computer numeric controlled) router for use by qualified members. Unlike most tools, all Spark instruction and documentation for the X-carve is in wiki format for easy reference. Certification classes are available for Spark members, and notifications of upcoming classes will be emailed out to the membership.
Tool Safety
As with all tools in the Spark Woodshop, safety is paramount.
- Wear proper personal protection equipment (safety glasses, hearing protection, respiratory protection)
- Keep loose clothing, hair, and jewelry away from the spindle motor
- Do not bypass any safety devices
- Keep hands out of the machine operating area anytime the e-stop is off
- If something is broken or breaks, notify one of the wood shop leads at woodshop@sparkmakerspace.org
X-Carve Basics
Spark has an X-Carve CNC machine with a 75cm x 75cm (29.5in x 29.5in) working area. The computer software used to control the machine is Easel. Spark members planning to use the X-Carve will need to sign up for an Easel account, which can be used to design programming for the X-Carve from any computer with internet access. Users can log into Easel from the computer in the woodshop to control the X-Carve.
X-Carve Capabilities
The X-Carve/Easel combination is capable of cutting and carving many kinds of wood and plastic, but not metal. Complex parts or surface engravings may be cut. However, the X-Carve/Easel combination is limited to making mostly flat cuts. Without additional software, users will not be able to do 3D surfacing operations. For more information, talk to one of the Woodshop Leads.
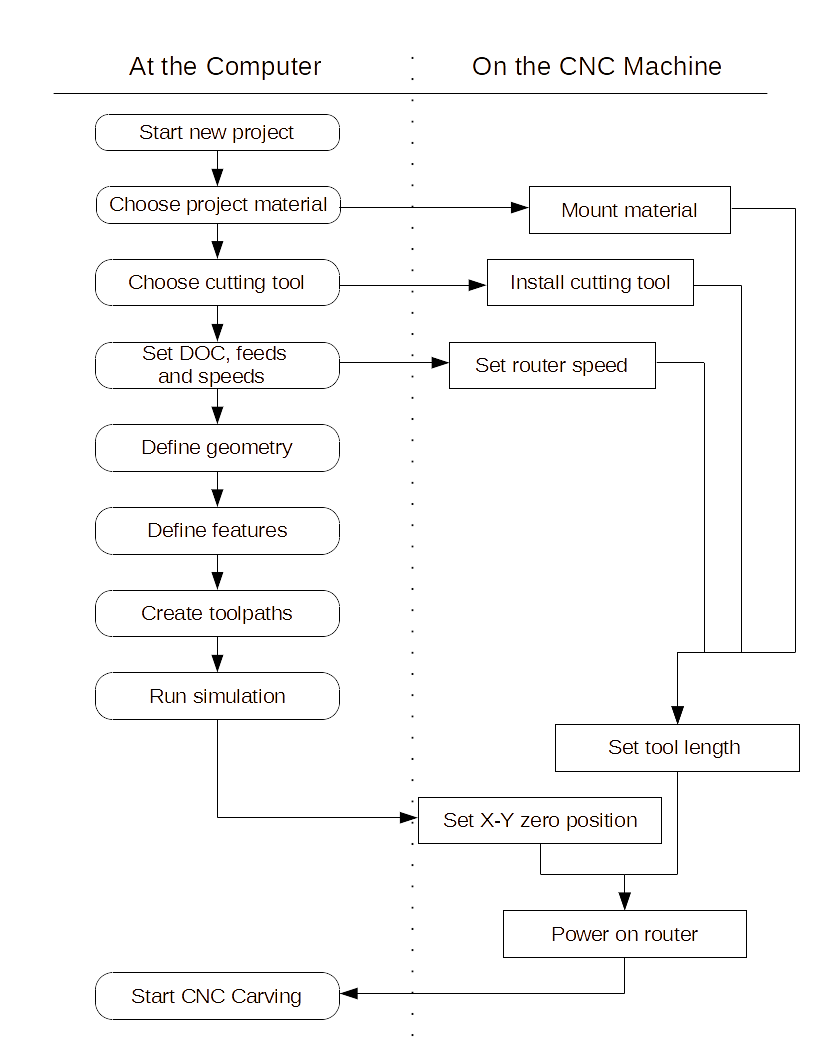
X-Carve Operation Flow Chart
X-Carve Example
The certification class for the X-Carve will use Easel software to carve a small plastic keychain. The class example part is a round tuit, for all those projects waiting for you to get one.
X-Carve Baseline Configuration
- E-stop is pressed
- Computer and controller are left powered on
- Cutter is removed from the router spindle
- Collet and nut are removed from the router spindle, and put in the correct location on the CNC storage tray
- All clamp arms, clamp bases, and clamp screws are removed from the work table and put in the correct location on the CNC storage tray
- The machine and the area around it is cleaned of chips and debris
