Difference between revisions of "Computer Deployment"
Jump to navigation
Jump to search
m (Jjfs85 moved page Computer deployment to Computer Deployment without leaving a redirect) |
|||
| Line 1: | Line 1: | ||
= How to Deploy a New Machine = | = How to Deploy a New Machine = | ||
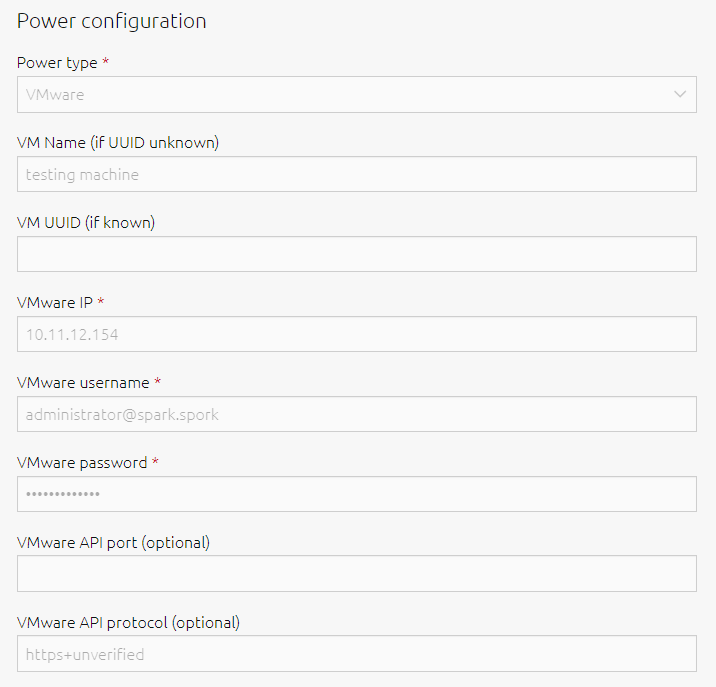
| + | [[Image:VMWare_Power_Settings.png|300p|thumb|VMware Power Management Settings]] | ||
# First, set the machine to PXE boot by default and turn it on. This allows MAAS to detect the machine. | # First, set the machine to PXE boot by default and turn it on. This allows MAAS to detect the machine. | ||
# Navigate to [http://maas.spark.spork:5240/MAAS/ http://maas.spark.spork:5240/MAAS/] on the Spark network and login with your administrator credentials.<br> | # Navigate to [http://maas.spark.spork:5240/MAAS/ http://maas.spark.spork:5240/MAAS/] on the Spark network and login with your administrator credentials.<br> | ||
# Rename the machine to whatever you want. | # Rename the machine to whatever you want. | ||
| + | # If you're deploying to a VM, configure the power management settings. They should look kinda like that picture there. | ||
# Commission the machine (you may need to manually start the machine if it doesn't have IPMI - workstations don't) | # Commission the machine (you may need to manually start the machine if it doesn't have IPMI - workstations don't) | ||
# Deploy the machine using one of the following userdata scripts: | # Deploy the machine using one of the following userdata scripts: | ||
Revision as of 06:04, 30 November 2021
How to Deploy a New Machine
- First, set the machine to PXE boot by default and turn it on. This allows MAAS to detect the machine.
- Navigate to http://maas.spark.spork:5240/MAAS/ on the Spark network and login with your administrator credentials.
- Rename the machine to whatever you want.
- If you're deploying to a VM, configure the power management settings. They should look kinda like that picture there.
- Commission the machine (you may need to manually start the machine if it doesn't have IPMI - workstations don't)
- Deploy the machine using one of the following userdata scripts:
Ubuntu Workstation with GUI
#!/bin/bash
HOSTNAME=$(hostname)
IP=$(hostname -i | awk '{print $1}')
echo "$HOSTNAME.spark.spork" > /etc/hostname
FQDN="$HOSTNAME.spark.spork"
echo "FQDN is: $FQDN"
sed -i "1 i\
$IP $FQDN $HOSTNAME" /etc/hosts
echo "10.11.12.156 freeipa.spark.spork freeipa" >> /etc/hosts
apt-get -y update
apt-get install -y nfs-kernel-server nfs-common
DEBIAN_FRONTEND=noninteractive apt-get -y install freeipa-client tasksel
ipa-client-install --hostname=$(hostname -f) --server=freeipa.spark.spork \
--domain=spark.spork --no-ntp --unattended --principal=enroll --password='thispasswordsucks' \
--realm=SPARK.SPORK --mkhomedir --force-join
sed -i '/ticket_lifetime/a renew_lifetime = 28d' /etc/krb5.conf
DEBIAN_FRONTEND=noninteractive tasksel install ubuntu-desktop
reboot now
Ubuntu Server
#!/bin/bash
HOSTNAME=$(hostname)
IP=$(hostname -i | awk '{print $1}')
echo "$HOSTNAME.spark.spork" > /etc/hostname
FQDN="$HOSTNAME.spark.spork"
echo "FQDN is: $FQDN"
sed -i "1 i\
$IP $FQDN $HOSTNAME" /etc/hosts
echo "10.11.12.156 freeipa.spark.spork freeipa" >> /etc/hosts
apt-get -y update
apt-get install -y nfs-kernel-server nfs-common
DEBIAN_FRONTEND=noninteractive apt-get -y install freeipa-client
ipa-client-install --hostname=$(hostname -f) --server=freeipa.spark.spork \
--domain=spark.spork --no-ntp --unattended --principal=enroll --password='thispasswordsucks' \
--realm=SPARK.SPORK --mkhomedir --force-join
sed -i '/ticket_lifetime/a renew_lifetime = 28d' /etc/krb5.conf
